If I knew then what I know now...
Author: John on May 11, 2016
Recently I started a new job. As I am learning the layout of the land and the tools my fellow teammates use, I was re-introduced to Tmux and Tmuxinator. I recall having installed tmuxinator, but I didn't get very far with it. Today I'd like to illustrate something I learned and I wish I had known about when I was still at AT&T.
At AT&T, the team I was on were building Virtual Servers first with VMWare, and then later with KVM. I remember spinning up a handful of servers and having to update or tweak settings. Some of our steps were automated and some where not. (Yeah, yeah don't get me started about why we weren't using Chef or Puppet or whatever.)
The point is, I needed to ssh to several virtual servers and then create/edit files on those servers. I had tmux installed on our 'jump' server but I didn't know about tmuxinator at the time. I would like to illustrate what I've learned recently and in doing so it should demonstrate how I really could have used this back then - back when I was still at AT&T.
1. Check that you have tmux installed and are at a reasonable version
➜  ~ tmux -V
tmux 1.9a
➜  ~
2. Check to see if you have tmuxinator installed:
➜  ~ gem list | grep tmuxinator
➜  ~
3. If you didn't get a response, install the tmuxinator gem:
➜  ~ gem install tmuxinator
Fetching: tmuxinator-0.8.1.gem (100%)
/Users/jfhogarty/.rvm/gems/ruby-2.2.3/gems/tmuxinator-0.8.1/bin/mux maybe `gem pristine tmuxinator` will fix it?

    __________________________________________________________
    ..........................................................

    Thank you for installing tmuxinator.

    Make sure that you've set these variables in your ENV:

      $EDITOR, $SHELL

    You can run `tmuxinator doctor` to make sure everything is set.
    Happy tmuxing with tmuxinator!

    ..........................................................
    __________________________________________________________

Successfully installed tmuxinator-0.8.1
1 gem installed
➜  ~
4. Additional confirmation (or what you may have seen in step 2):
➜  ~ gem list | grep tmuxinator
tmuxinator (0.8.1)
➜  ~
5. Create a directory to place your tmuxinator related yml files
cd ~
mkdir .tmuxinator
6. Navigate to your favorite place to put learning material. For example:
cd ~/Documents/LEARNING_NOTES/
mkdir tmux
7. Change to the newly created directory and create some empty test files:
➜  tmux touch sample_file1.txt
➜  tmux touch sample_file2.txt
➜  tmux touch sample_file3.txt
➜  tmux touch sample_file4.txt
➜  tmux touch sample_file5.txt
➜  tmux touch sample_file6.txt
8. Create a yml formatted file for us to test tmuxinator
cd ~/.tmuxinator
touch tutorial.yml
vim tutorial.yml
Use the following settings then save the new tutorial.yml file:
# ~/.tmuxinator/tutorial.yml

name: remote
root: ~/Documents/LEARNING_NOTES/tmux

windows:
  - local: ls -la
  - remote:
      layout: even-vertical
      panes:   # :setw synchronize-panes
        - server1:
          - vim sample1.txt
        - server2:
          - vim sample2.txt
        - server3:
          - vim sample3.txt
        - server4:
          - vim sample4.txt
        - server5:
          - vim sample5.txt
        - server6:
          - vim sample6.txt
Now the fun stuff begins.
9. While still in your ~/.tmuxinator directory, start tmuxinator
tmuxinator tutorial
This should start tmux with two windows. You can use Cntrl+a then w to see the
available windows:
(0) Window displaying your ls -la command
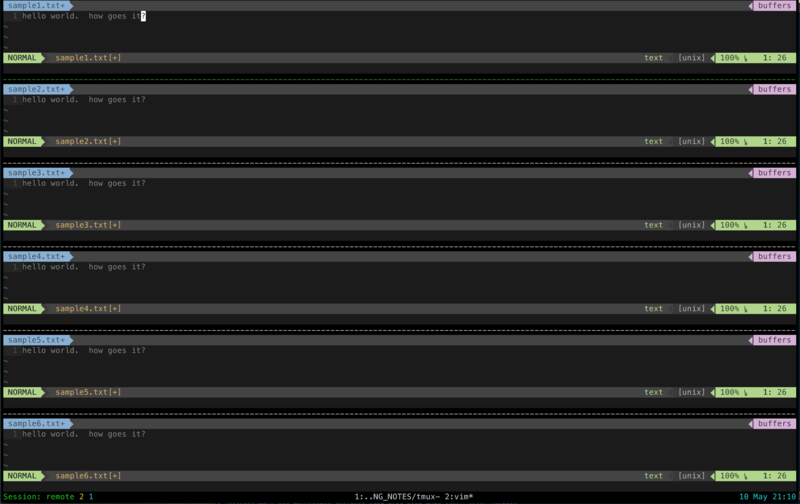
(1) Window displaying 6 panes of vim, each with one of the sample files open
Highlight (1) and press enter so we are working with the six panes of vim
10. Now, we need to send tmux a command. Do so using:
Cntrl+a then :
Now type:  setw synchronize-panes
Ready for the fun?
Enter insert mode in vim (i) and start typing.

Awesome eh? I hope this simple example illustrates how you can leverage tmux,
along with tmuxinator to do some pretty cool things and improve your workflow.
Learn Something New Everyday
Last Edited by: John on May 11, 2016